Saturday, September 5, 2009

WOOF!


Thursday, August 13, 2009

Copper Trellis out of well, copper plumbing things.


A few years ago, when I first bought my house, I crafted a 'privacy screen' to battle a crazy neighbor, out of copper. I have wanted to re-craft some nifty bit of copper as a plant trellis. On a recent visit to Annie's Annuals (heaven for flower lovers) I picked up a climbing vine in need of support.
So I got out the blowtorch and whipped up this trellis. Big magic! I love fire! I can send you the how to's about, well, how to, if you email me. It's not rocket science, but it is pyrotechnics.
The plant has been in the planter for about two weeks and has already begun its ascension.

Litchee Tomato


I picked up these wicked cool tomatoes from Love Apple in Santa Cruz.  I have them planted in 15 gallon nursery pots and I've been feeding them like a nut job.  They are covered in menacing thorns from stem to stern and although I have had no fruit yet from them, I'm anticipating a bumper crop if I can keep them fed and happy.  They are an interesting fruit in that they need a love...there must be two in order for them to do their thing.  I kinda like that...romantic veggie love....

Squirrel Proof Bird Feeder.


No need to elaborate.  

Trellis for Butternut Squash


Butternut squash in a cage.  Yes.  Mr. 'Possum decided he dug the whole idea of squash in general.  He has a MUCH harder time garnering my squash when it's up high.

Upside down tomato experiment, year three.


Can you even believe that tomatoes have over-wintered three years and are still going???  Check this guy out!

So how are those SIP doo dads doing???

So here are some posted photos of the grow boxes over the past several months.  So far, so good.  I have a list of things I'd do differently if I go for this again next year....mainly around watering, (as in, gotta get automated with it...it's not that I'm lazy, but I feel that the hand watering is not good on a save water level.  Has to be a better way.) and pipe location, as well as lime and added fertilization needs. These are from roughly May/Early June.


And the same boxes/buckets currently as they stand:


Pretty cool, actually, although I'm dealing with a lot of frustrating blossom end rot right now.  I have been adding hydrated lime to the boxes via the tubes, and it seems to have helped.  I think our weather this summer in Nor. Cal. has been off, ergo, it's a late summer of veggies.  In general, I'd say this has been the most successful garden experiment I've undertaken so far....each box or bucket has produced many tomatoes already (or cucumbers or eggplant) and I'm already planning next year's assault on the yard.
I will say: It is a pain to water these, and if I am going to do it again, I will absolutely stick these twerps on a drip system.  

What the heck am I growing???

This summer it's been 42 varieties of heirloom tomatoes.  I can give you a list if you like, but am far too lazy to do it now.
Seven eggplant.
Six cucumbers.
White and yellow corn which will likely cross pollinate and become quasi-corn.
White turnips from Love Apple Farms.
Beets of various incarnations, about six varieties.
Lovely purple carrots.
Ten varieties of hot peppers.  I only grow bell peppers for my friend Paul, since I'm massive allergic to them....but I can eat roasted Anaheim's and Jalapenos any day of the week.  I'm looking forward to my jaunt out to Erickson Farms in Suisun to get my dose of fresh roasted peppers this next week! Yum....echos of Santa Fe.
What else?  
Black and white currents.
Concord grapes.
Eggplant...I think five brands.   'Though, the rosa bianca is my favorite.
String beans in six varieties.
Pumpkins.
Watermelon.
Lemons. 
Raspberries, blackberries.
TONS of, no a LUDICROUS amount of basil.
Butternut and spaghetti squash.
Zephyr squash and garden variety green zucchini, although the opossum have carried off so much of my squash I've barely had but three.
Nectarines---same story with animals, but these are being had by the local squirrel population.  Ergh.
Litchee tomato from Love Apple Farm.
Various herbs.
Tons of greens/lettuces.
I'm sure I'm missing something here. 

It is amazing what a small yard can yield.  I totally encourage even the smallest patch of dirt to PRODUCE!

SIP, with kind regards to Bruce of Green Roof Growers.

This summer's garden extravaganza began as a means of letting my overused soil rest for the summer.  But what to do about all of the tomatoes that will be missed if the soil is left unplanted?  Could I live without the abundance, the sheer glory of luscious red, green, and striped, or beautiful purple/black goodness?I think not!
So, on a mission was I for some sort of alternative....and I found it through Green Roof Growers.  They have a fab-o web site that delivers good information about crafting your own earth box type of thingy.  I highly recommend them, they are wonderful.
  Follow the link here and you'll end at their site.

The following photos will give you an idea of what to expect in terms of how to's:

materials:
Two five gallon buckets or two 18 gallon rubbermaid tubs.  Procedure is basically the same for both.
A 1/2" drill bit.
A 1" circular drill bit.
A door knob drill bit for the smaller baskets.
A utility knife.
Ridiculous amounts of zip ties.
1" PVC pipe or drinking safe water hose (which I will use for all SIPS next season...PVC, while rigid, is the pits in terms of leaching nastiness into your hard won veggies...) cut to about three feet each.  I will make the pipe longer next year.
Landscape fabric.
Scissors to cut fabric.
Potting MIX, not potting SOIL.  Huge important.
Various organic fertilizers.  I use Cynthia Sandberg's of Love Apple Farm's concoction of potting mixes in the soil.  She is wonderful.  Check her out on line.  If you are ever in Santa Cruz, you have to take a class or, if the farm is open, stop in and scope out her fabulous operation.  I learned more from her in six hours than I've learned in six years elsewhere.  In fact, I'm signed up for two more of her wonderful classes!
Um, yes, back to bizznessss....
I think that covers supplies.  The most expensive things here, assuming you have all drill bits, is the SOIL and FERTILIZERS you intend to put into the mix.  I know the earthbox site will tell you it only needs a strip of fertilizer at the top and dolomite in the soil, but I am here to say, it ain't enough.  I mixed a ton of other goodies into the soil and it's paid off.  The only thing I'm still wrestling with is calcium deficiency.   But our weather here is a drag this summer, so...ah well....
Onward!

This is the operation:  Two large five gallon buckets.  I got mine from Home Depot. I also crafted these same doohickies from two Rubbermaid tubs.


You also need a 1" drill bit.  That's the white thingy.  And a doo
r knob driller bit.  I suppose you'll also need a drill.  Oy....

You also need a pond basket.  For the smaller five gallon numbers, I used two small 3" basket which I picked up at my local very cool hydroponic store.  For the Rubbermaid tubs, I
 used two 5" baskets.  Super easy to locate at HD or any hardware store that sells pool or pond supplies.

So, next step was drilling the living daylights out of one of the bottoms of the buckets.  I used a half inch drill bit for the job.  I'd for sure pick up something that has oodles of power and ability to gnaw through pvc for this one.  

The following photos more or less show the process:

The two large holes were done with the door knob bit and the wee one is with the 1" bit.  The smaller hole will house the tubing for watering.

Now drill the hell out of the bottom with the 1/2" bit.  I set it all up in the garage and made an assembly line.  This will aerate soil later on.  Yay!

So, I drilled some holes around the openings and then zip tied the pond baskets to the bucket.  Worked well.  No problems....just kinda tedious.  Yawn.

Next step.  Grab the other bucket and drill a 1/2" hole about four inches up into the side of the bucket.  This will be your overflow hole.  
Then cut your pipe to be a few inches taller than the bucket.  Some sites will tell you to cut the pipe on an angle to allow for flow of water.  Me, I have no hack saw, ergo, I drilled the PVC with several holes instead.

Next step is to put the pipe through the smaller hole.  I ended up drilling a couple holes next to the sides of the pipe and zip tying, because I cannot get enough of zip ties, the pipe to the inside bucket.  

Plants.  Finally.

Potting mix.   MUST BE MIX.  If potting SOIL is used, it won't wick up through the pond basket.
So, now we come to it:  The planting.  Lord.  Thank heaven. I though it'd never happen!  Put one bucket inside the other....baskets into the largely un-drilled bits.
So, whatcha do here is, you mix up a bit of potting mix with water, then cram it into the baskets.  It should be about the consistency of mud pies.  Yes.  Mud pies.  
Then add more potting mix, and at this point, the bucket should be half full.  I added dolomite here, as well as several other goodies in the fertilizer department, and I watered the dirt.
Next, I filled the bucket with more soil, and dampened it again.  At the top, I placed about a cup and half of slow release 4-6-4 fertilizer on top of the dirt.   
I then cut a length of landscape fabric to go over the top of the dirt, and zip tied, (be still my heart---zip ties!) the fabric to the bucket.  FYI: it takes nine large zip ties to go around the bucket.  I'm just telling you this so that, unlike me, you can avoid having to figure it out each time!
I then cut an X where I wanted the plant to go, pulled the plant out and VOILA!  Planted.  Imagine that!
The final piece looks like this:

or if you are using Rubbermaids, (a process I will not explain..basically the same as the buckets but for inverting the other Rubbermaid and drilling holes in the bottom of the tote....I'm tired.  Give me a break, o.k?)
I will let ya'll know how it all turns out.

I just love a good garden experiment!

Sunday, January 11, 2009

Baby Oppossum!


So here is a little cutie that roamed my garden.  I actually rescued him for a bit in a box, as I was afraid local kitties would have their way with him.  

Results of Grow Bag Experiment


We had what can only be described as a strange growing season. 
Early summer fires brought overcast skies along for the ride.  Seems like none of my farmer friends had very good crops.  
By comparison with last summer, I'd say the ground had given up.  The tomatoes got blossom end rot...something I will head off this next season.
Many vines just sort of wilted away.  My current belief is that I need to let the soil rest next year, so I'm going to be either growing all things in grow bags, OR I'm going to shell out for some earth boxes, OR I'm going to get crafty and create my own earth boxes.
This all being said, I got enough good veg. to dehydrate, freeze, or cook into sauces or can for the winter.  
As to the grow bag experiment, here are my findings:

Most of the tomatoes did not produce as expected.  The one exception to this is the tomato which STILL continue onward and upward at the side of the yard.  This is the one plant which was planted in a ten gallon bag.  Moral?  Next year, larger bags.
That one plant still has about twenty pieces of fruit on it which I'm hoping will ripen up.  It's been pretty cold here in Northern California, so I'm rather amazed that this one little twerp is hanging in there, when all his brothers and sisters have keeled over.
The other veggies planted in bags produced very little.  This could be because I didn't fertilize enough, or because of location in the yard.  

Oddly, the upside down guys produced fruit from vines of two years ago right up until I yanked their spindly selves from the hanging planters yesterday!  I cut them back, and am hoping for year three of growth.

Beet Ravioli Step FOUR: Sauce


The simpler the sauce, the better on this one.   I browned about three tablespoons of butter, a bit of sage and rosemary, and some pine nuts.  When the pasta had cooked, I plated it up, drizzled the pasta with the butter mix, and topped with the pine nuts, some fresh rosemary, and mizithra, although any hard Italian cheese would be groovy, I'm sure.
The results of this were wonderful!   Great with wine, and home made flat bread....which is another recipe to post at some point!  Mangia!

Beet Ravioli Step THREE


Next, you'll want to stir one egg together. You'll use this as a binding for your ravioli shells.
I have gone through much angst and drama in the past, laboriously creating my own pasta for these critters. These days, given my schedule and time factor, I use the wonton wrappers from the grocery store. This recipe will make enough beet mix for one entire package of wonton wrappers, or for one 2 cup size of pasta dough from scratch.

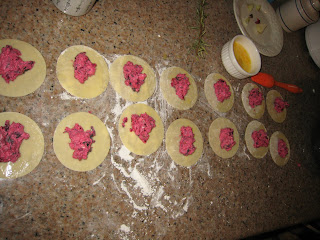
I set up about eight to ten wrappers, then brush all edges with the egg mixture using my handy pastry brush. I like the silicone brushes for this process since they don't leave behind the really nasty bits of brush that natural bristles will. I find myself picking sable hairs out of my paintings, which is pain in the neck enough for me, I don't want to pick them out of my cooking as well.

Onward....

Use one level teaspoon of filling for the ravioli. If you put too much in, it'll squoosh out the sides and won't hold when you boil them.

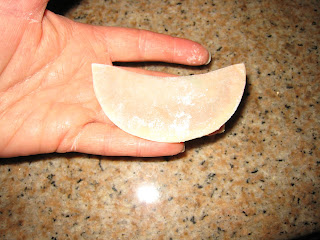
Carefully fold over the ravioli and pinch the edges. Some folks can do this on the sink, I'm a clutz and must do this by picking each one up, and pressing all edges pretty hard. If their is any leaking of filling, I find it easier to fix if I'm holding the individual ravioli.

When finished with all the ravioli, I toss them onto a wax paper lined cookie sheet with a bit of flour. I can stack three layers of ravioli, so long as I place wax paper and flour between each layer.

At this point, the whole works goes into the freezer, less the amount I want to keep out for dinner.

To cook, boil salted (teaspoon of sea salt) water to a low boil. Too rapid and it'll break up the puppies.

Drop them in gently, one at a time. If they are fresh, you'll only have to cook them about 40 seconds. If they are frozen, a little over a minute will do. They are done when the pop to the surface.